| 27.9. Module Help Editor | ||
|---|---|---|
 | Chapter 27. MATE |  |
| 27.9. Module Help Editor | ||
|---|---|---|
| | Chapter 27. MATE | |
A module's help is created based on .mhelp files. When these are edited in MATE, a number of additional, help-specific features are available: a customized GUI with special outline appearance and toolbar, syntax highlighting, and auto-completion. The goal is to keep the actual documentation generation process invisible to the user; for details on the workflow behind the scenes, see Section 27.9.3, “How it Works”.
The free text areas use the reStructuredText (reST) markup, see Section 27.9.2, “Formatting”. Aside of the usual formatting, two expressions are important. “Roles” refer to extensions for inline markup in reST, in our case for field and module references. “Directives” refer to extensions that add support for new constructs, in our case links to images, screenshots, and cross-references.
To open MATE as Help Editor, either open a .mhelp file or right-click a module and select Help → Edit Help.
When editing the help file of a module, all important information of the module down to the field specifications are extracted automatically. The basic module information is therefore always available in the module help. Additional documentation should be added by the user, especially into the areas Purpose, Usage, Details, Interaction, and Tips.
The directives for screenshots (.. screenshot:: [window]) are already prepared, one entry for every window of the module. To remove the screenshot from the module help, just remove the text from the screenshot entries.
The help is aware of changes, this results in the following for field and enumeration items:
Field is added: field is marked as new and needing documentation.
Field is removed: documentation text is kept but marked as being removed. Previously written help text is stored in the .mhelp file but will not be visible in the resulting HTML help.
Field is renamed: if the field name is deprecated, the text is copied. (Otherwise, the system interprets the renaming as an adding and removing of fields, so documentation text needs to be moved to the new field manually.)
![[Tip]](images/tip.png) | Tip |
|---|---|
With these change-tracking mechanisms, the TestCenter can be used to test for documented fields. |
For fields and enumerations, the first paragraph of the help is used as a tooltip in the panels. This should be kept in mind while entering information.
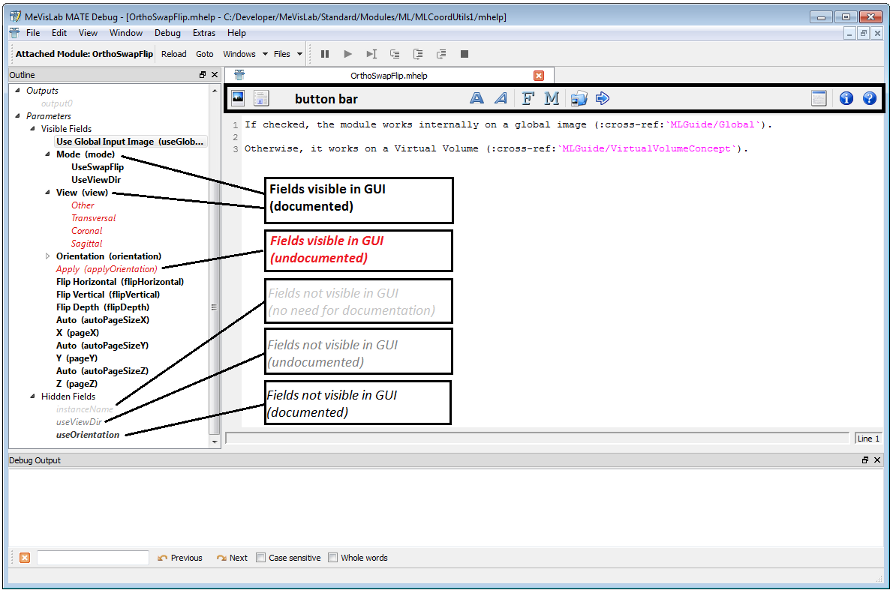
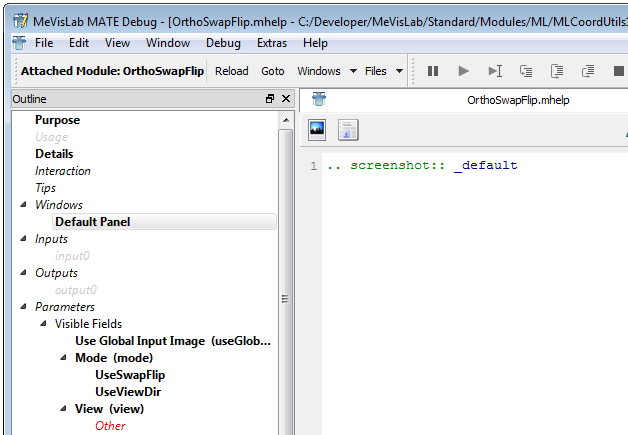
The outline formatting is as follows to show the state of the documented items:
red italic: User-added documentation still missing.
black bold: User-added documentation exists.
light-gray italic: Element with “Needs documentation” unchecked.
dark-gray italic: Fields not visible in the GUI.
dark-gray italic bold: Fields not visible in the GUI, for which user-added documentation exists.
Formatting of the text can be done via the buttons in the middle of the toolbar (see Table 27.3, “Help Toolbar Buttons”), using the context menu (see Figure 27.21, “Text Context Menu”), and manually entering the markup in reST syntax (see Section 27.9.2, “Formatting”).
Generating the actual HTML help can be done with ( ) or without (
 ) prior screenshot generation. The result is automatically displayed in the default browser.
| Tip |
|---|---|
On the first generation of the HTML help, MATE checks for screenshots being made no matter which of the two buttons above you press. |
Table 27.3. Help Toolbar Buttons
| Button | Description | Explanation |
|---|---|---|
| Check screenshots and generate help | Opens a window first in which the screenshots to be created can be selected. For the selected screenshots, the images are created and added to the If the module window is open with visible data, the window will be captured as-is; this allows for adding illustrative information via the screenshots. |
| Generate Help | Compiles the help project to create HTML output without creating new screenshots. |
 | Bold | Formats selected text in bold (** ** in reST syntax). |
 | Italic | Formats selected text in italic (* * in reST syntax). |
 | Field link | Adds a field link in the editor. |
 | Module link | Adds a module link in the editor. |

| Image link | Opens a dialog to browse for images relative to the mhelp folder of the module's help. |
 | Insert cross reference | Opens a dialog in which references to other documents and sections in the MeVisLab help can be entered. |
 | Show reST | Opens the help source in reST format in a new tab. The reST format serves as the basis for HTML creation; therefore, in case of help generation problems, check this to identify the problematic lines. |
 | Show information | Toggles an information area on top of the editor area. It shows information about the selected element and module. |
 | Help | Toggles a help area on top of the editor area. It shows general information on how to enter contents in the help format. |
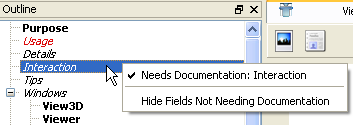
Two options for the outline display are available from the context menu:
Needs Documentation [element]: If checked, the entry appears in red italic; if not checked, it appears in light-gray italic.
Hide Fields Not Needing Documentation: Hides all fields for which “Needs Documentation” is unchecked.
| Tip |
|---|---|
The context menu entry can be selected by using the right mouse button. If you need to toggle the requirement for documentation for multiple fields, simply use the right mouse button to bring up the context menu and select the option with the same button. |
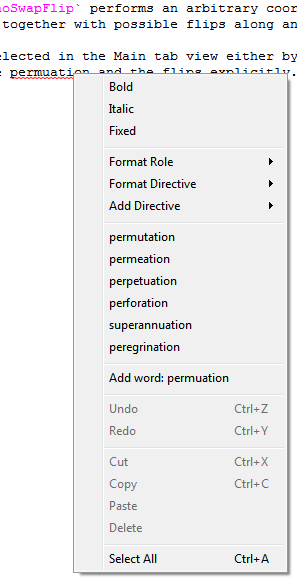
The context menu of the text area offers shortcuts to the three basic formatting styles bold, italic, and fixed (see below). If more than one word is selected, the formatting will be applied to the entire selection. If the cursor is placed on a word, the formatting is only applied to this word. It also offers shortcuts to format words as roles (field, module, overview) and directives (screenshot, image, image in package, cross-reference), and to add new directives (images and crosslinks).
If a word is unknown to the spellchecker, it will be underlined in red. The context menu (of that word) offers known variants as a correction or to add the unknown word to the user's dictionary.
For the formatting, reStructured Text (reST) syntax is used. It has some similarity with MarkUp or Wiki syntax.
The editor supports the editing process by two means: syntax highlighting of reST elements and autocompletion.
Selected formatting options:
Table 27.4. Inline markup
| Markup | Output |
|---|---|
*text* | italic text |
**text** | bold text |
``text`` | fixed space text |
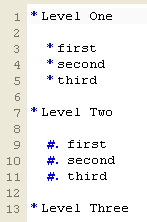
* |
|
#. |
|
[number]. (e.g., 2.) | 2. explicitly numbered list |
|
|
|
|
Table 27.5. Directives
| Directive | Effect |
|---|---|
|
| Inserts the referenced image. |
|
| Inserts the referenced image from another package. |
|
or
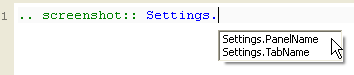
| Inserts the screenshot (if already created) or a link to the screenshot. Example with autocompletion:
|
Table 27.6. Roles
| Role | Effect |
|---|---|
:field:`(modulename.)fieldname` | Links to a field of a module. |
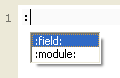
:module:`modulename` | Links to a module. Example with autocompletion:
|
:overview:`overviewname` | Links to an overview. |
:cross-ref:`document/targetptr` | Links to targetptr in another document. Use “Insert Cross-Reference” to insert this role (see Table 27.3, “Help Toolbar Buttons”) |
:file-in-package:`packageIdentifier.relative/path/to/file` | Links to a file in a package. This is similar to the image-in-package directive. |
:relative-link:`relative/path/to/file` | Links to a file relative to the mhelp file. |
:sub:`superscript`\ text | Adds a superscript to the text. |
:sub:`subscript`\ text | Adds a subscript to the text. |
For more information about the reST syntax, see Sphinx reStructuredText Primer.
.mhelp files are written in MDL and have an MDL tree structure. They are created from the module interface definition and the GUI definition. Upon every edit initiated from a module's context menu in MeVisLab, this MDL tree is created again with all module data in the module help being updated automatically. The texts that the user adds in the actual “Edit Help” step are merged with the updated data. If the module has changed in structure, e.g., elements, fields, or enumerators are moved or renamed, this will be handled as follows: deleted elements will be removed, added elements will be added, renamed elements will be renamed, and a help text will be added to the element.
Upon creation, the following information from module sources is extracted and added to the module help:
Windows: For each window of the module, an outline entry with the respective screenshot directive is added.
Inputs: Each input is added as outline entry. Available comments are added as documentation for the respective inputs.
Fields: All fields used in the GUI windows are added as outline entry (red italic). After that, all fields not visible in the GUI (“hidden”) are listed (dark-gray italic). Available tooltips will be added as documentation for the respective fields.
The conversion of the .mhelp file to HTML happens in two major steps:
The MDL file is converted to reStructured Text (see reST) by a core macro module .
In a second step, the reST format is converted to HTML via Sphinx (see Sphinx Python documentation generator). To enable every MeVisLab user to create module help, Sphinx is provided with and integrated into MeVisLab.
The help system is implemented in MeVisLab core libraries, this makes the automatic generation of tooltips from help texts (and from tooltips to help text upon first creation of a help file) possible.
All module help source files are generated in a mhelp directory
alongside the module definition files to which they belong.
Resulting HTML files are placed in the Documentation folder of the package.
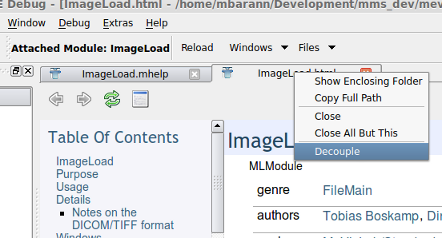
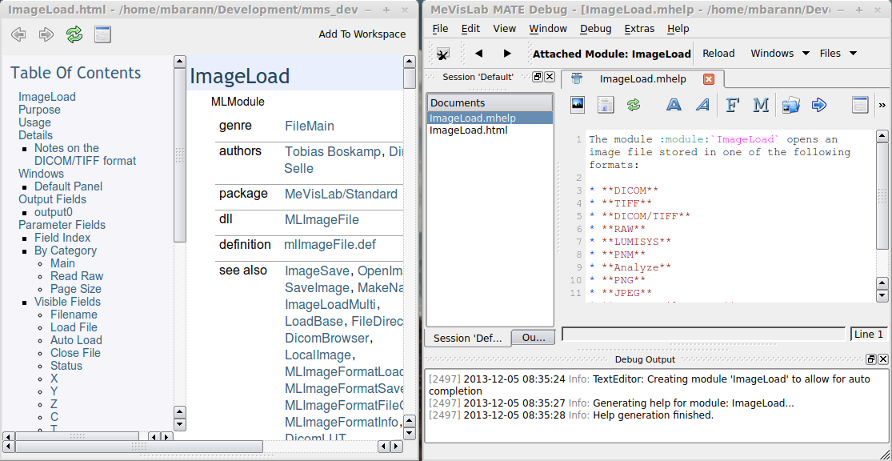
You can tell MATE to open generated module help documents in an internal HTML view instead of the system web browser (Section 27.7, “Preferences”). The HTML view is an additional tab in the workspace:
You can view the module help editor and the HTML view at the same time, by decoupling the HTML view from the workspace as a separate window:
By pressing the Add To Workspace button, the HTML view is returned to the workspace:
© 2026 MeVis Medical Solutions AG
| |  | |
| 27.8. Python Debugger |  | 27.10. Session Management |