| 16.2. Developing a Test Case | ||
|---|---|---|
 | Chapter 16. Using the TestCenter | |
| 16.2. Developing a Test Case | ||
|---|---|---|
| | Chapter 16. Using the TestCenter | |
In this section, we will develop a test case for the Threshold module. The Threshold module transforms the input image to a binary image with:
voxel values below the threshold being set to the minimum image value.
voxel values at or above the threshold being set to the maximum image value.
The TestPattern module will be used for the input image.
The ImageStatistics module will be used for verifying the test results.
Open the TestCaseManager via the menu bar, File → Run Test Case Manager.
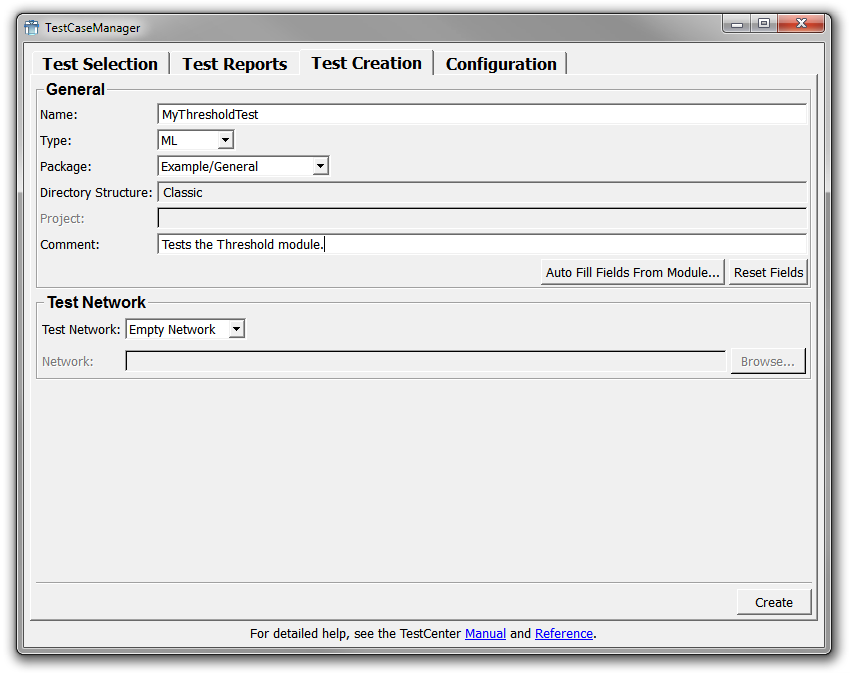
Select the Test Creation tab.
Enter the following:
Name: MyThresholdTest
Type: the type of your module, this selects a sub-directory in the test directory.
Package: your package, for example “Example/General” (this is the example user package created in Section 8.2, “Creating a User Package for Your Project”)
Comment: Tests the Threshold module.
![[Note]](images/note.png) | Note |
|---|---|
As we will build the network in the next step, start with an empty network here. If you already had a network that could be used as test case, you could import it here. |
Click Create to create the test case.
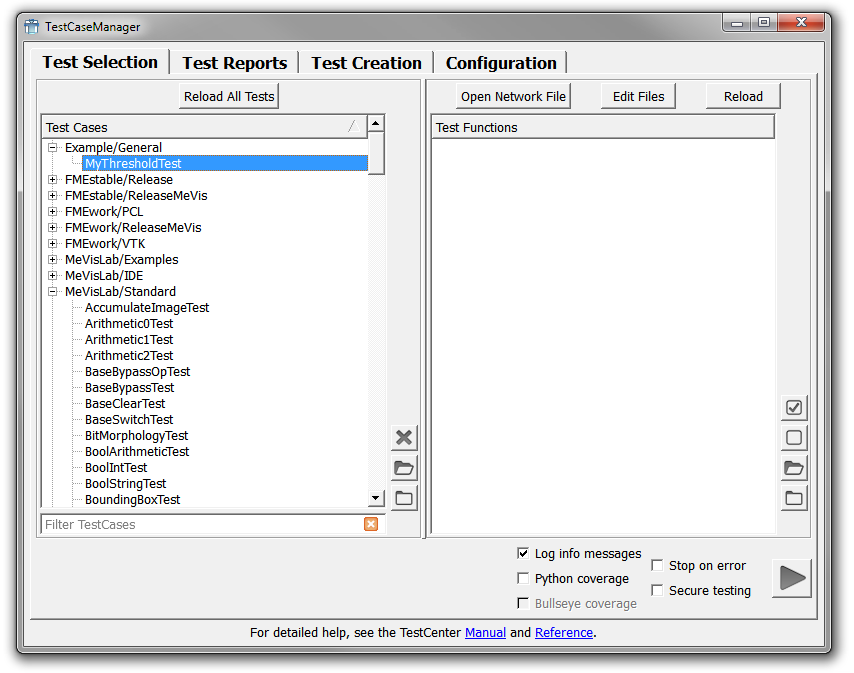
The test case is created and the Test Selection tab is opened, where you can now find the new test case.
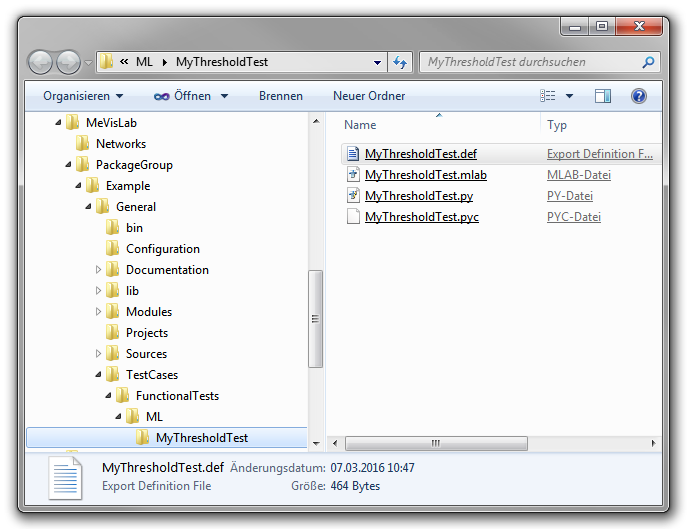
In your package path, a new folder Testcases/FunctionalTests/MyThresholdTest is created. MyThresholdTest contains the necessary files for the test case:
MyThresholdTest.def: for the test case definition, similar to the MeVisLab module definition files. Contains the keyword “FunctionalTestCase”, a timeout parameter and the reference to the script file, in this case MyThresholdTest.py.
MyThresholdTest.mlab: the example network, empty so far
MyThresholdTest.py: the Python scripting for the test case
Our test case is associated with a test network, so in the next step, we need to add the necessary modules to the so far empty network.
In the TestCaseManager, select the new test case and click Open Network File. The empty network opens in MeVisLab.
Add the three required modules:
Threshold
TestPattern
ImageStatistics
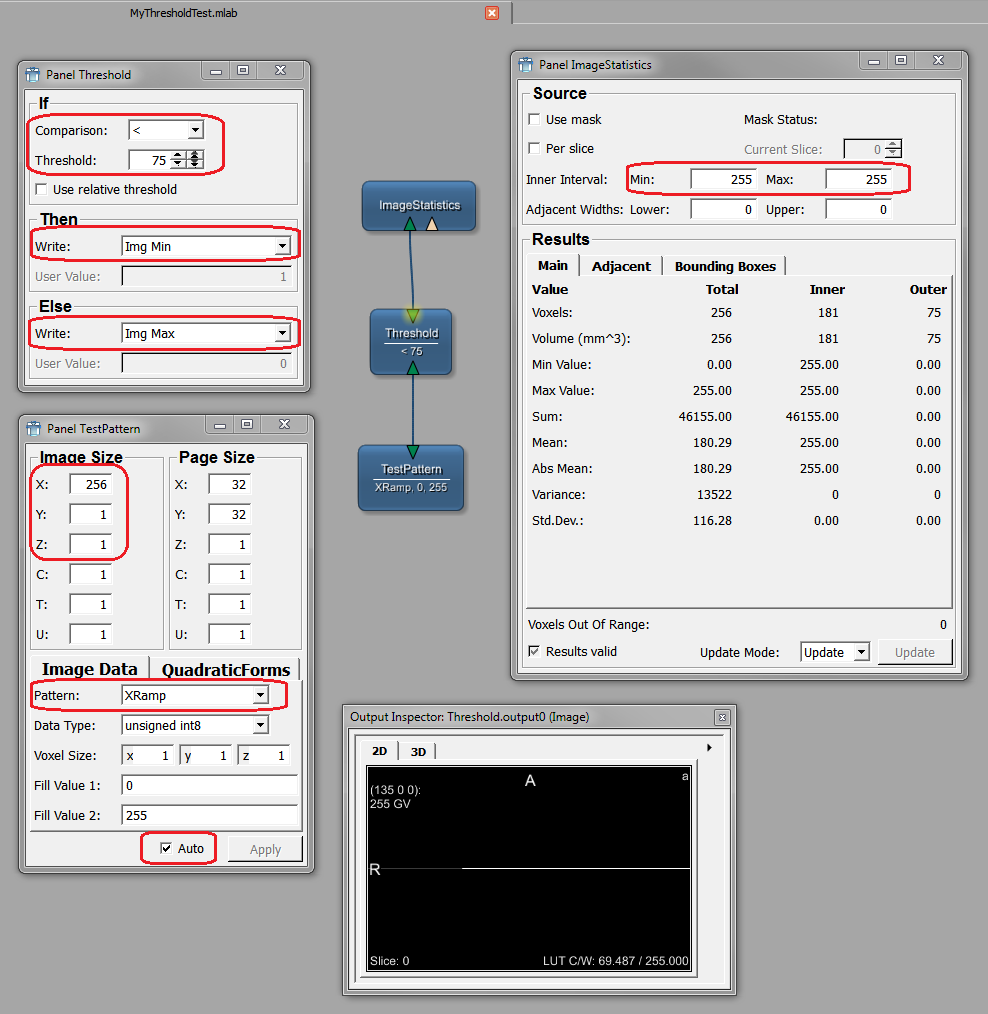
Connect the modules as can be seen in Figure 16.4, “Basic Test Case Setup”.
Save the network.
For the test case, a setup is necessary with which the function of the Threshold can be tested. This can easily be done when the voxel values in the image correspond to the position on the x-axis that is determined by the threshold value n.
Modify the TestPattern parameters:
ImageSize: X = 256 and Y = Z = 1. This draws a horizontal line.
Pattern: XRamp. This creates a gradient from voxel value 0 to 255.
Auto: check this option to generate an output image automatically.
Modify the Threshold parameters:
Comparison: set this to < (less than).
Then - Write: set this to ImgMin.
Else - Write: set this to ImgMax.
Modify the ImageStatistics parameters, so that the Inner Interval is Min = Max = 255. This way, all voxels with the value = 255 will count as inner voxels. (Min and Max could also be set to 0; in this case the voxels with value = 0 would count as inner voxels — the decision between inner and outer here is arbitrary and irrelevant as long as the correct fields are compared later.)
Save the network again.
With this setup, the voxel values in the created image are equal to the position on the x-axis. Voxels below the threshold are set to value = 0, voxels above the threshold are set to value = 255. For example, for a threshold of 75, 75 voxels are set to 0 (counting as outer Voxels) and 181 voxels above the threshold are set to 255 (counting as inner voxels), as can be seen in the results on the ImageStatistics panel.
In the next step, the actual test script needs to be programmed. In our case, the threshold needs to be set and the results have to be verified.
In the TestCaseManager, select the test case and click Edit Files. The files open in the integrated text editor MATE. The generated file MyThresholdTest.py looks like this:
#from TestSupport import Fields
    #from TestSupport.Macros import *

    #def TEST_exampleFunction():
    #    """ Testing foobar """
    #    Fields.setValue("MyModule.foo", 1)
    #    EXPECT_EQ(2, Fields.getValue("MyModule.bar"))
Remove the comment symbol # from the lines.
Rename exampleFunction to something recognizable, for example “TEST_ManualTest_75”. The tests are executed in alphabetic order. If you need to execute them in a certain order, you can add numbers to the tests, e.g. TEST001_, TEST002, etc. Note that this is generally considered bad practice - test cases should be independent of each other.
Add the actual function. Three actions are needed:
The threshold has to be set to a value, for example “75”.
The ImageStatistics module has to be updated.
It has to be verified that the value for the outer voxels corresponds to the entered threshold value.
This is done with the following Python code:
    Fields.setValue("Threshold.threshold", 75)
EXPECT_EQ(Fields.getValue("ImageStatistics.outerVoxels"), 75) ![[Tip]](images/tip.png) | Tip |
|---|---|
The function EXPECT_EQ checks whether two given values are equal. It is a Python function modeled after the macro of the same name in the GoogleTest library. For quick help, right-click the name in MATE and select Show Help for 'EXPECT_EQ'. Further information on the TestCenter macros and functions can be found in the TestCenter Reference. |
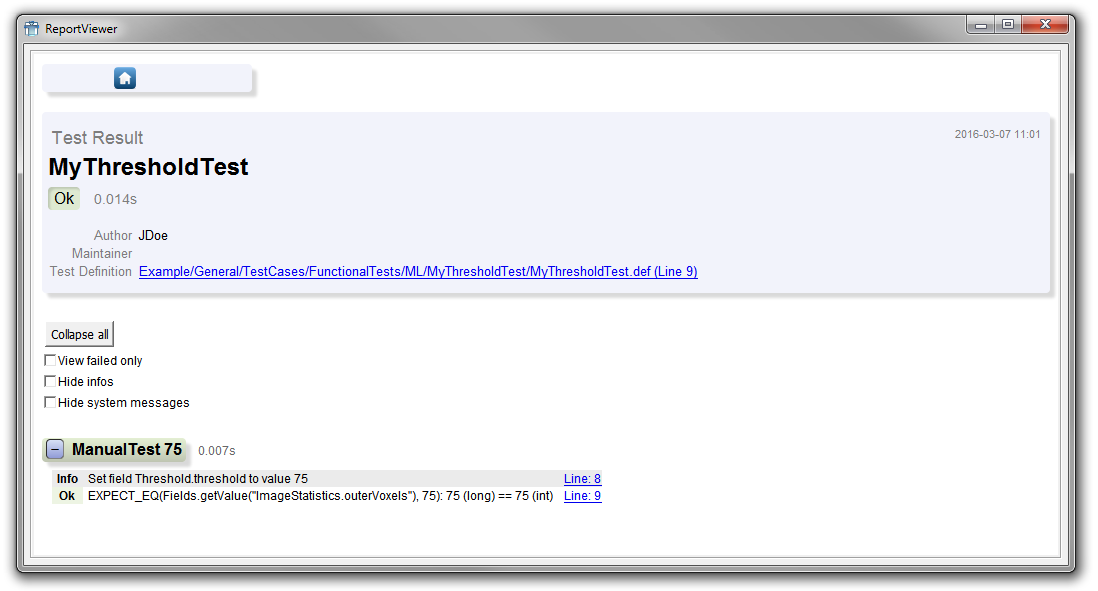
Save the script. The resulting code for this manual (static) test is:
from TestSupport import Fields
    from TestSupport.Macros import *

    def TEST_ManualTest_75 ():
        """ -- Basic test for threshold values -- """
        Fields.setValue("Threshold.threshold", 75)
        EXPECT_EQ(Fields.getValue("ImageStatistics.outerVoxels"), 75)
| Note |
|---|---|
|
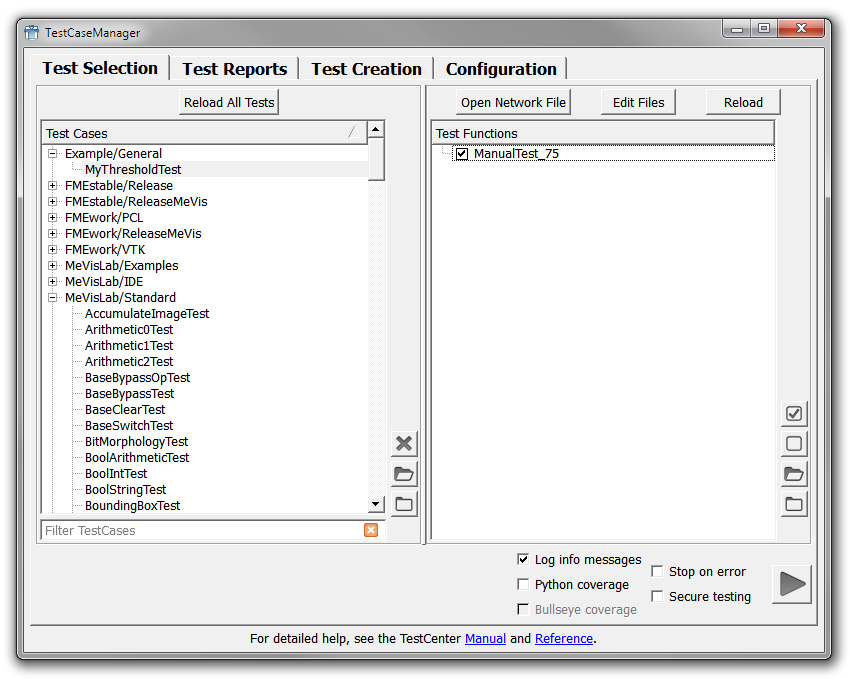
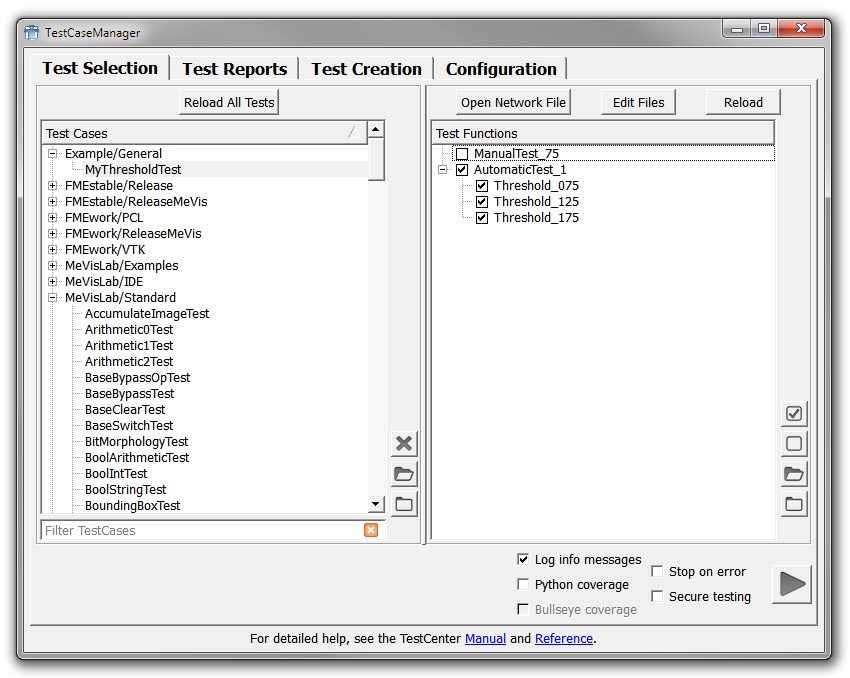
In the TestCaseManager, select the test case and click Reload to reload the test case. The new test function will be listed on the right.
| Tip |
|---|---|
When hovering over the test function with the mouse, the function's comment is displayed as a tool tip. |
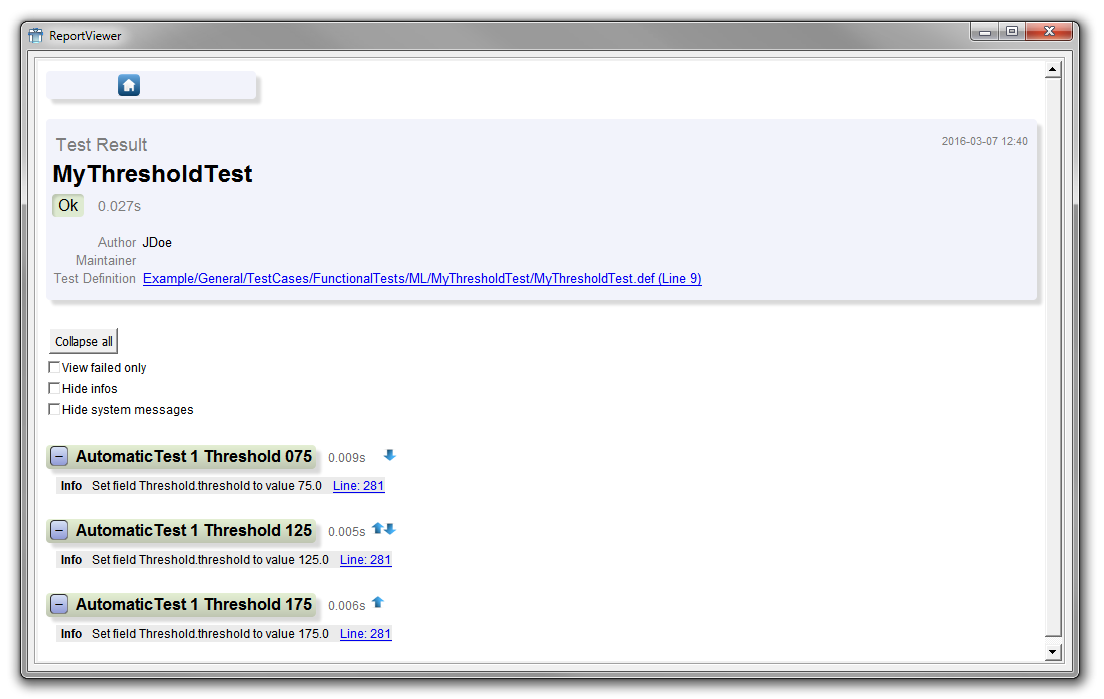
Finally, click on Run to run the test function. The option Secure Testing defines that the test case is run in another instance of MeVisLab; you might want to keep it checked.
The report should look as follows:
| Tip |
|---|---|
For defining the test functions status, the MeVisLab debug console is used (OK, Error, Warning), see also “ExampleTestCase1” in the test cases for the |
Excursion: About Context and Fields
When using the Scripting Assistant (see MeVisLab Reference Manual, chapter “Scripting Assistant”), the following scripting line would be offered when setting the threshold value: ctx.field("Threshold.threshold").value = 75. The context “ctx” is the context from which the scripting is called up. When called up in an ML module, the context would be the ML module. If called up in a macro module, the context would be the macro module. The context also defines which context-sensitive help link is offered in the integrated text editor MATE.
For testing, however, using “ctx.field” is not the sensible approach because this way, the value for the field is directly set and will remain as set even after the closure of the test function and the start of the next test function. This might result in undefined conditions of the test case. The better solution here is to set the value with Fields.setValue("Threshold.threshold", 75). This sets the value only for the currently running function and then sets it back to the saved value the field had before calling the function.
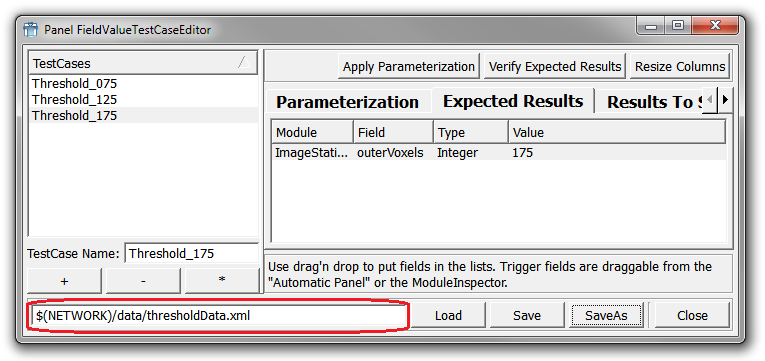
One possibility to automate our example test is to use the FieldValueTestCaseEditor module. With it, field-value test cases can be created.
| Tip |
|---|---|
Aside of the module described in the following chapter, other modules are available to handle field-value test cases, for example |
Add the module FieldValueTestCaseEditor to your test network and save the network.
The user interface is split into three main parts:
The FieldValue (FV) Test Cases list is on the left. There are three buttons to add (+), remove (-) and duplicate (*) test cases.
The FV test case editing is done on the right. Here, test cases can be (re)named and parameterized.
The listed FV test cases are saved as one set in an XML file, which is handled on the bottom of the window.
| Note |
|---|---|
To save the FV test case set later, a data folder has to exist below the test case, for example |
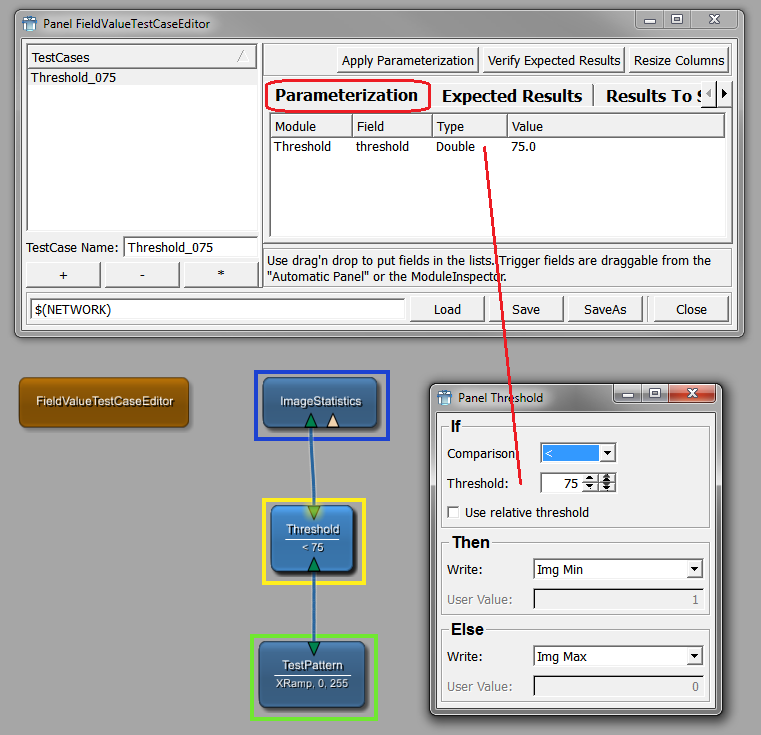
To create a small set of three FV test cases for different threshold values, proceed as follows:
Click on the + button beneath the FV TestCases list to add a new test case.
Enter the FV TestCase name, for example “Threshold_75” and press RETURN.
Add the necessary parameters, in our case the threshold value of the module Threshold. To do this, drag the field from the module's panel onto the Parametrization tab.
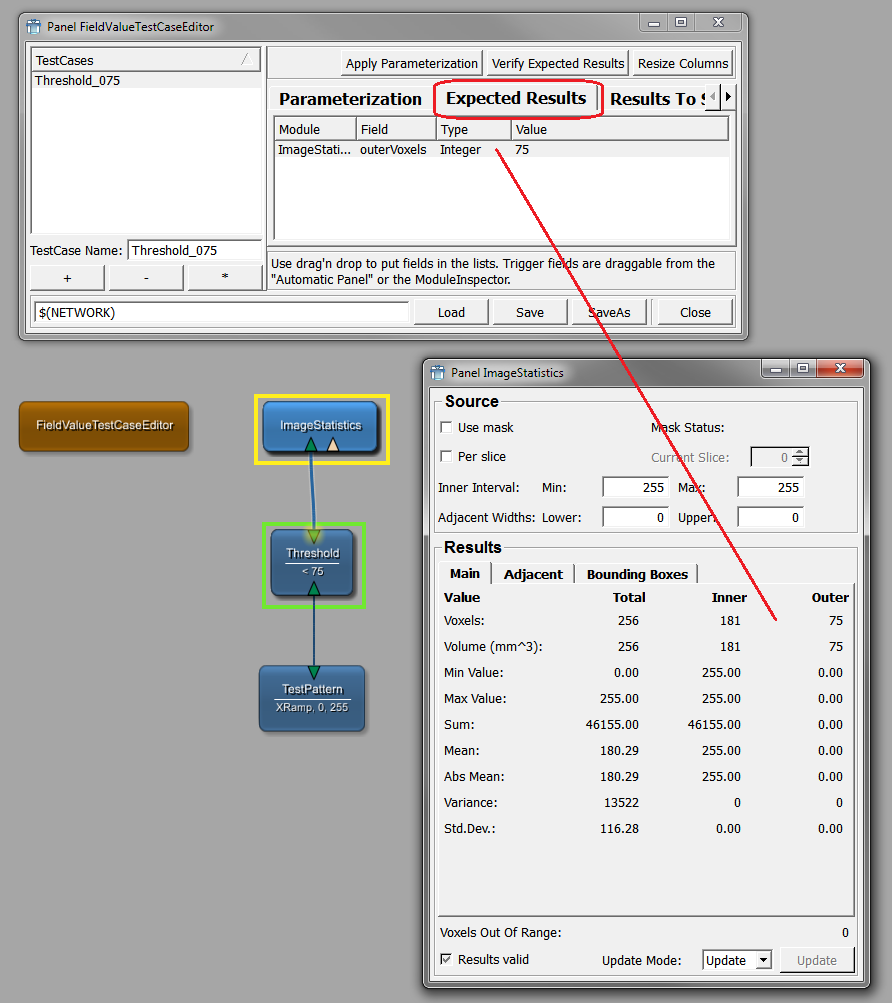
Click on the Expected Results tab to enter the expected result. In our case, it is a value of “75” for the outerVoxels parameter, so drag this parameter into the list and edit the value, if necessary.
Select your FV test case and click the * button twice to duplicate the entry, as we need two further test cases for threshold = 125 and threshold = 175.
Edit each new FV test case by adapting the name of the function, the used threshold value, and the expected result value.
| Note |
|---|---|
The processing order is alphabetically, so for sorting the order of your test cases, enter the test case names accordingly. |
In the field on bottom, enter the path and file name as $(NETWORK)/data/thresholdData.xml, then click Save.
For integrating the new FV test cases, add the following two things to your scripting code:
Add import os so that your function can use the Python functions for handling platform-dependent strings.
Add the new test function beneath the first:
def FIELDVALUETEST_AutomaticTest_1():
     return os.path.join(Base.getDataDirectory(), "thresholdData.xml")
The return path expects the test case data file we just created.
In the TestCaseManager, reload the test case.
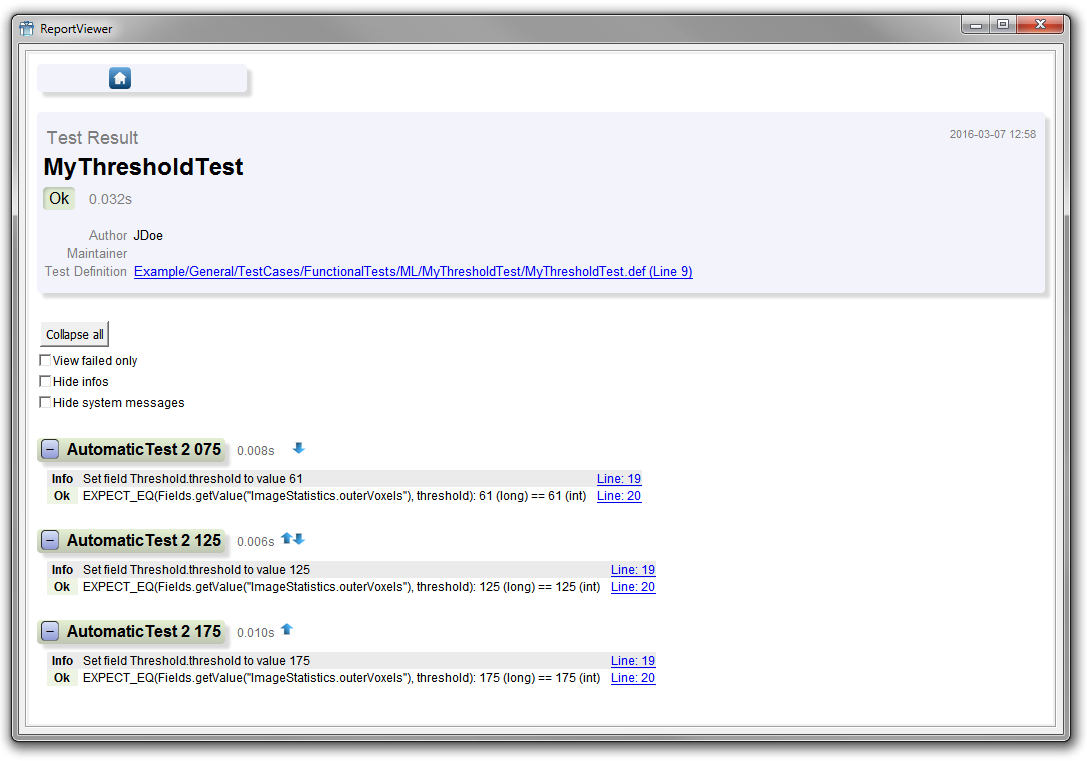
Select “AutomaticTest_1” and run it. The report should look as follows:
| Tip |
|---|---|
If you want to use only a subset of the field-value test cases, explicitly add the relevant subset at the end of the line, for example: return os.path.join(Base.getDataDirectory(), "thresholdData.xml"), \
['Threshold_075', 'Threshold_175']
This way, only the test cases for threshold values of 75 and 175 would be run, while the test case for value 125 would be omitted.
|
| Tip |
|---|---|
For another field-test example, see “ExampleTestCase5” in the test cases for the |
For this, the test function we implemented first will be used with a parameter instead of a fixed threshold value, and the parameter is changed in the test function.
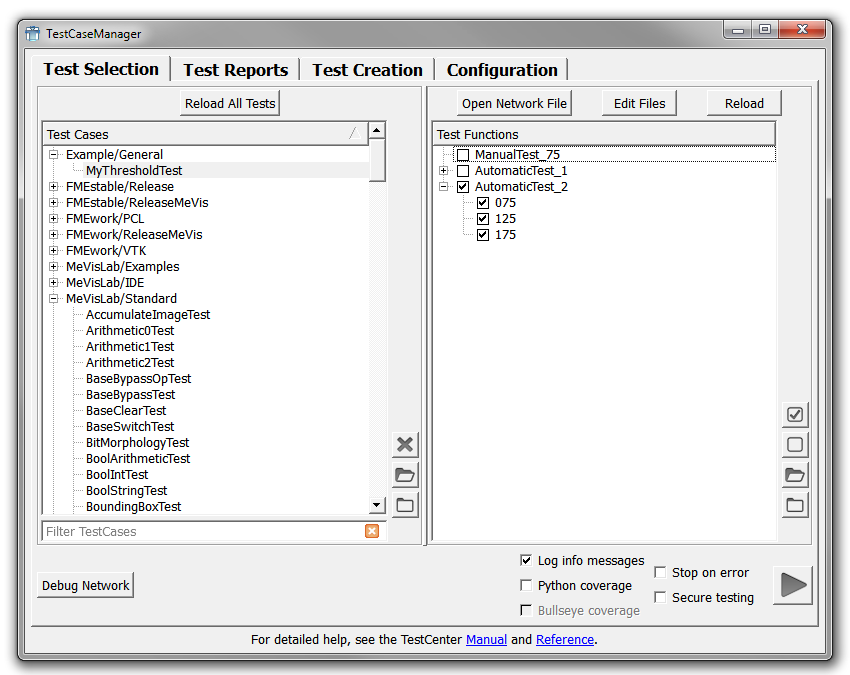
Add the new test function:
def ITERATIVETEST_AutomaticTest_2():
    return {'075':075,'125':125,'175':175}, computeVoxels
Instead of a simple list, we use the Python's dictionary class here to have a nicer listing.
| Note |
|---|---|
The processing order is alphabetically (and not given by the dictionary's order!), so for setting the order of your test cases here, enter the dictionary names accordingly. |
Add the actual test:
def computeVoxels(threshold):
    Fields.setValue("Threshold.threshold", threshold)
    EXPECT_EQ(Fields.getValue("ImageStatistics.outerVoxels"), threshold)
The computeVoxels function is essentially the same function as entered for the manual test case, but now using the parameter threshold. The function is called for every entry in the dictionary.
In the TestCaseManager, reload the test case.
select “AutomaticTest_2” and click on Run to run the test function. The report should look as follows:
TEST functions can be grouped. This is useful for grouping tests in the Test function list.
For a quick example, simply copy “ManualTest_75” and change the “75” in name and value to “125”. (In reality, nobody would want to group such redundant test cases but would make use of the automation approaches as described above.) Make sure to give the test a new number, so the resulting test function name might be “TEST004_ManualTest_125”.
Add the group definition:
def GROUP_ThresholdGroup():
    return (TEST_ManualTest_75, TEST_ManualTest_125)
Save the scripting.
In the TestCaseManager, reload the test case. The new “ThresholdGroup” appears in the test functions list. It looks and works similar to the automatic tests.
Screenshots can easily be created with the ScreenShot method.
Here a quick example:
Create a new test case called “MyScreenShotTest”.
To the example network, add the modules LocalImage and View2D and connect them. Save the network.
Then edit the scripting:
Configure the LocalImage module by setting the image path:
Fields.setValue("LocalImage.name", "$(DemoDataPath)/Bone.tiff")Configure the View2D module, for example by setting the slice:
Fields.setValue("View2D.startSlice", 0) Add the screenshot method and store the result in a variable:
result = ScreenShot.createOffscreenScreenShot("View2D.self", "screentest.png")Add two lines that make the result available in the report:
    Logging.showImage("My screenshot", result)
    Logging.showFile("Link to screenshot file", result)
The full code is:
from TestSupport import Fields, Logging, ScreenShot
from TestSupport.Macros import *
def TEST_Create_ScreenShot ():
""" -- Creates a single screenshot -- """
Fields.setValue("LocalImage.name", "$(DemoDataPath)/Bone.tiff")
Fields.setValue("View2D.startSlice", 0)
result = ScreenShot.createOffscreenScreenShot("View2D.self", "s_test.png")
Logging.showImage("My screenshot", result)
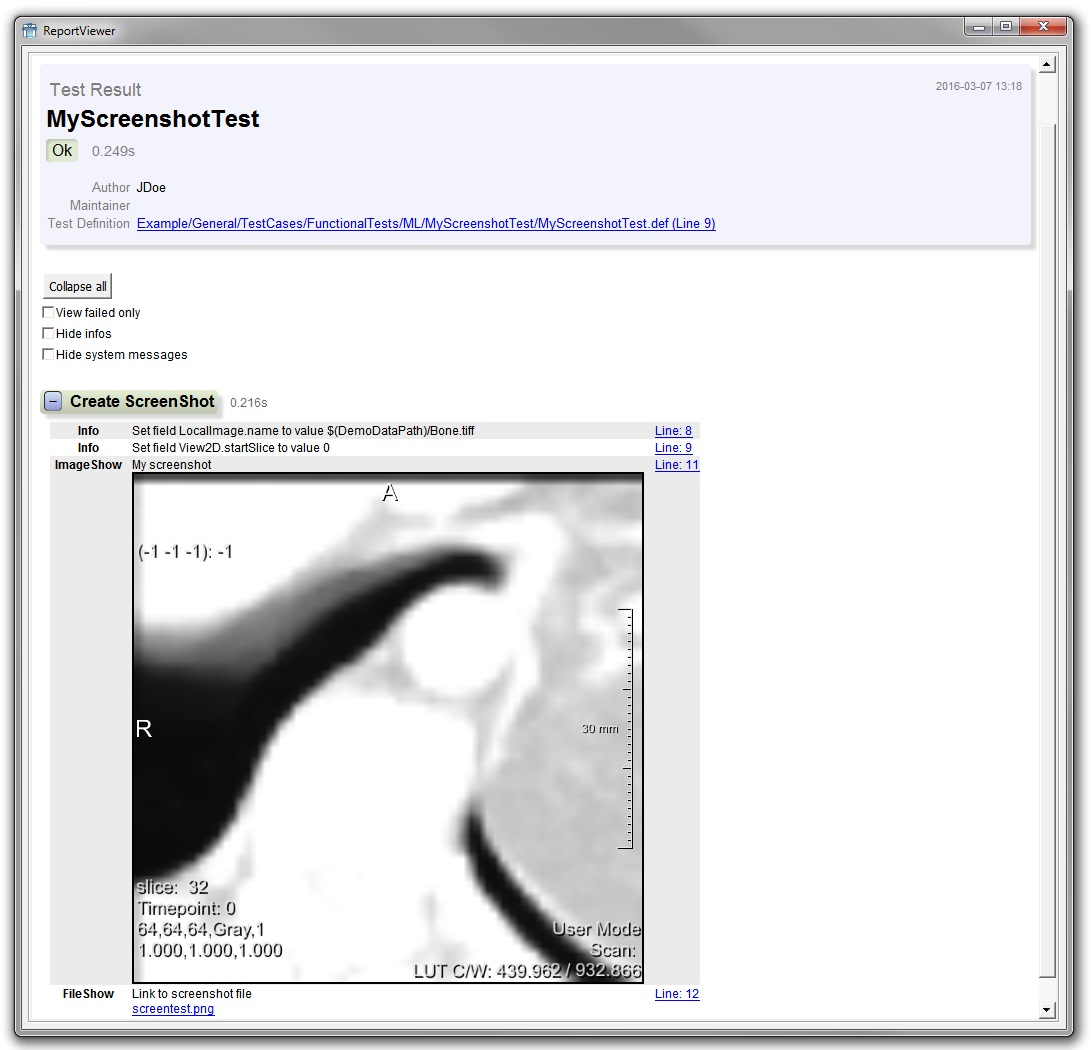
Logging.showFile("Link to screenshot file", result)Save it all and run the test function.
The report should look as follows:
| Tip |
|---|---|
For a more complex screenshot example, see “ExampleTestCase4” in the test cases for the |
This was a short, practical introduction to the MeVisLab TestCenter. For further information, see the TestCenter Reference.
It may be desired to disable test functions when they always fail because of a known bug. To do so append the prefix "DISABLED_" to the function name.
Test functions can also be disabled depending on a condition using the
disableTestFunctionIf(condition) decorator. condition can be a truth value
or a callable.
from TestSupport.Base import disableTestFunctionIf
from TestSupport.Macros import *

def canCreateScreenShots():
    if [...]:
        return True
    else:
        return False

# Disable this test function if screenshots cannot be created:
@disableTestFunctionIf(not canCreateScreenShots())
def TEST_Create_ScreenShot():
    [...]

# Disable this test function if the platform is unix:
@disableTestFunctionIf(MLAB.isUnix)
def TEST_TestWithWin32API():
    [...]
© 2026 MeVis Medical Solutions AG
| |  | |
| Chapter 16. Using the TestCenter |  |