| 10.3. Programming the Python Script | ||
|---|---|---|
 | Chapter 10. Developing a Macro Module for an Applicator |  |
| 10.3. Programming the Python Script | ||
|---|---|---|
| | Chapter 10. Developing a Macro Module for an Applicator | |
If not yet existing, create the Python file. For this, select
File → New in the MATE menu bar and save the new file as
ApplicatorMacro.py in the same folder as the
other module files.
![[Note]](images/note.png) | Note |
|---|---|
In your code, you may need to import some of the global classes like |
Then we need to add two functions, one for each scripting command
def AdjustLength():
    pass

def AdjustDiameter():
pass | Note |
|---|---|
In Python, block structure is defined by indentation. Therefore, it is important to indent the lines as shown in the code examples. In the MATE editor, this will happen automatically. |
Let us have a look at the diameter adjustment. The diameter is
given by the diameter field. This is written as
follows:
def AdjustDiameter():
    diameter = ctx.field("diameter").value
To have both an effect on shaft and tip likewise, the diameter
parameter of both must be set to the value of the
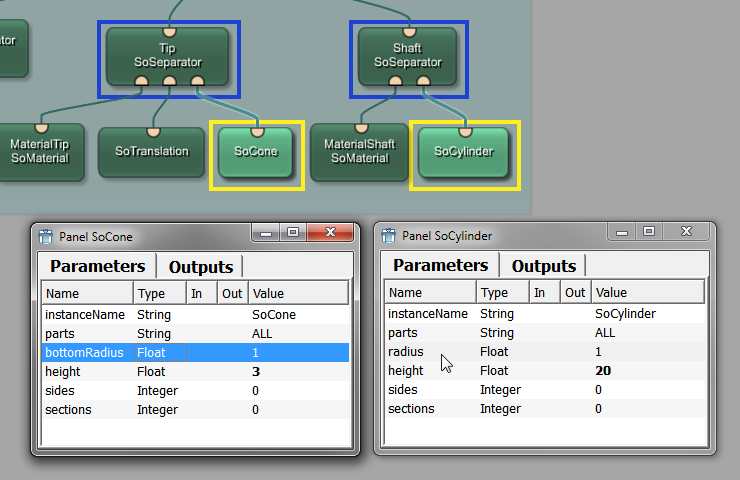
diameter field. A look at the automatic panels of
SoCone and SoCylinder shows that both modules offer a
radius parameter.
These radius parameters need to be set to
diameter:
    ctx.field("SoCone.bottomRadius").value = diameter
    ctx.field("SoCylinder.radius").value = diameter
As the radius is half the diameter, a correcting factor of 0.5 has to be added to the diameter equation.
def AdjustDiameter():
diameter = ctx.field("diameter").value * 0.5
ctx.field("SoCone.bottomRadius").value = diameter
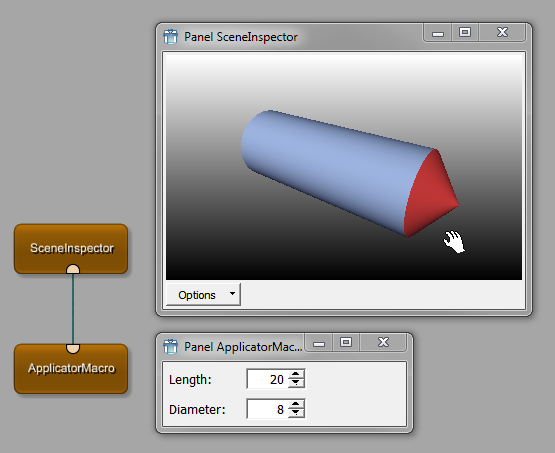
ctx.field("SoCylinder.radius").value = diameterTo test if the diameter adjusting works, add a SceneInspector module to the network and
connect its input to the output of your ApplicatorMacro module. Double-click the
SceneInspector to open its viewer.
When you change the diameter setting of the macro, the diameter of the
applicator is changed accordingly.
Adjusting the length is a bit more complicated. The length change should have the following effects:
The length parameter gives the overall
length.
Only the shaft should be extended, not the tip.
The adjustment should be done in a way that the point of the tip is not translated, that is that the tip points to the same position as before. Therefore, we need to increase the applicator length in the direction away from the tip.
We can define an overall length, a tip length and a shaft length. They can be calculated as follows:
def AdjustLength():
    overallLength = ctx.field("length").value
    tipLength = ctx.field("SoCone.height").value

    shaftLength = overallLength - tipLength
The original translation factor for the tip (which is the relevant factor) was given by half the shaft length (“10”) plus half the tip length (“1.5”). This can be written in a general way.
tipTranslation = shaftLength*0.5 + tipLength*0.5
The shaftLength defines the height of the SoCylinder cone to
ctx.field("SoCylinder.height").value = shaftLengthThe resulting code lines for the length adjustment look as follows:
def AdjustLength():
overallLength = ctx.field("length").value
tipLength = ctx.field("SoCone.height").value
shaftLength = overallLength - tipLength
tipTranslation = shaftLength * 0.5 + tipLength * 0.5
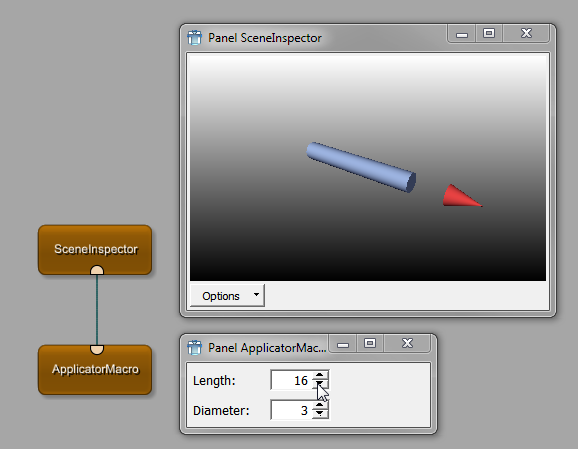
ctx.field ("SoCylinder.height").value = shaftLengthAdd this code to the Python script, save, and reload the definition. A test shows a funny effect: the shaft length is changed independently of the tip.
This is due to not having connected the calculated
tipTranslation with the TranslationTip module yet.
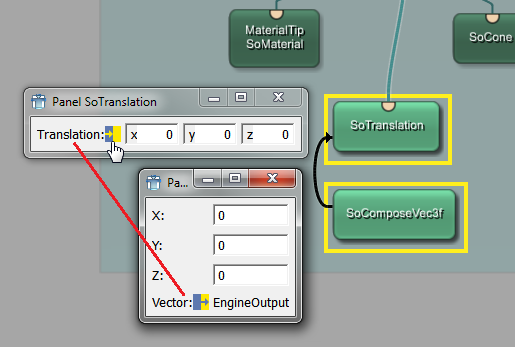
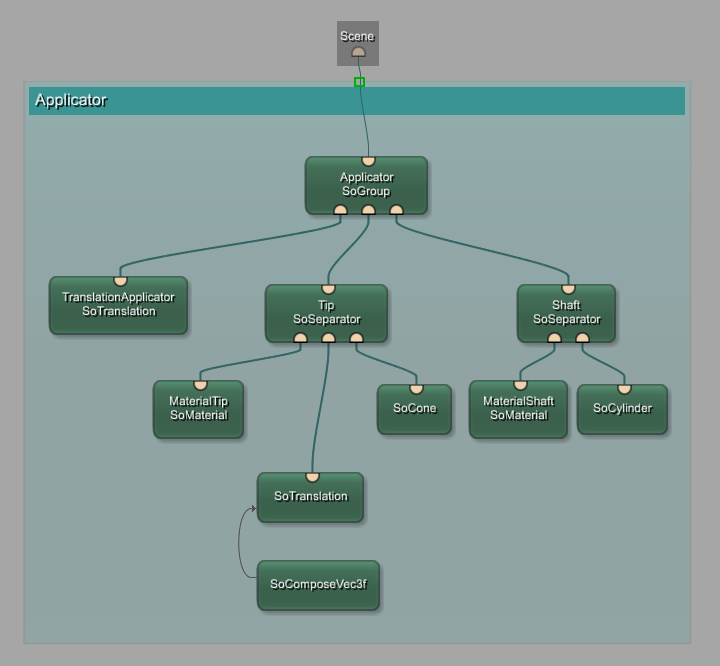
To solve this problem, add the SoComposeVec3f module to the internal network
of the macro and assign to its translation in y direction the
calculated value tipTranslation. Since SoComposeVec3f supports an arbitrary number of elements on x,y,z,
we have to use setListValue.
ctx.field("SoComposeVec3f.y").setListValue([tipTranslation])In a last step, this translation needs to be connected to the
tip's SoTranslation module via a
parameter connection in the network.
Here the network and complete Python script of the ApplicatorMacro example:
def AdjustDiameter():
    diameter = ctx.field("diameter").value * 0.5

    ctx.field("SoCone.bottomRadius").value = diameter
    ctx.field("SoCylinder.radius").value = diameter


def AdjustLength():
    overallLength  = ctx.field("length").value
    tipLength = ctx.field("SoCone.height").value

    shaftLength = overallLength - tipLength
    tipTranslation = shaftLength*0.5 + tipLength*0.5

    ctx.field("SoCylinder.height").value = shaftLength
    ctx.field("SoComposeVec3f.y").setListValue([tipTranslation])
© 2026 MeVis Medical Solutions AG
| |  | |
| 10.2. Adding the Macro Parameters and Panel |  | 10.4. Addition: Shifting the Whole Tip |