This document describes how to install MeVisLab on the supported platforms.
For the system requirements, see here.
![[Note]](images/note.png) | Note |
|---|---|
The PathTracer framework requires CUDA support, which is only available on Nvidia graphics cards. A screen resolution of 1920 × 1080 or higher is recommended. |
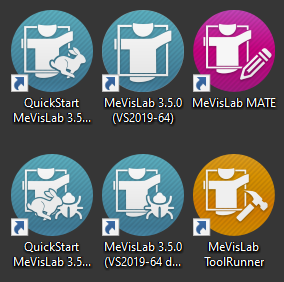
For Windows, a typical installation of the SDK results in the following programs being installed:
MeVisLab in release and debug versions. These versions scan the installed packages at startup to update the internal module database.
QuickStart MeVisLab in release and debug versions. These start MeVisLab without scanning the installed packages. While much faster, they do not update the internal database when modules are added or removed. If no module development is taking place, these programs are the preferred choice.
MeVisLab MATE, an integrated text editor that supports typical MeVisLab files with syntax highlighting, auto-completion, error checking, and more.
MeVisLab ToolRunner, a meta-tool for creating installers, documentation files, and more.
| Note |
|---|---|
Debug versions can only be started if a development environment, such as Visual Studio, is installed on the computer. |
For C++ module development, a later Visual Studio version can usually be used with a MeVisLab version created for an earlier Visual Studio version.
There may also be differences between Visual Studio Express editions and the full Visual Studio editions (Standard or Professional). Ensure that the compiler version you intend to use is supported by your Visual Studio installation.
CMake is used for compilation. See the CMake Manual for more information.
This section shows how to handle MeVisLab on Linux.
Get MeVisLab from https://www.mevislab.de/download/.
Only a 64-bit version is available, so a 64-bit version of Ubuntu is required.
After downloading, make the installer executable by running chmod u+x and then executing the *.bin file.
Select an installation directory; it will be referred to as InstallDirectory from now on.
You can start MeVisLab from the applications menu entry.
Alternatively, you can run
InstallDirectory/bin/MeVisLab.
InstallDirectory/bin/MeVisLab_d will start the
debug version of MeVisLab.
MeVisLab offers "Module Wizards", which are accessible via MeVisLab's file menu. They create the skeleton of ML and Open Inventor modules.
| Note |
|---|---|
The environment variable |
CMake is used for compilation. See the CMake Manual for more information.
The MeVisLab SDK for Linux can also be installed and used within a Docker image.
Since MeVisLab for Linux was built for Ubuntu, it is best to use Ubuntu as the base image.
Additionally, MeVisLab always requires a running X server. Therefore, xvfb is used for the installation. To use MeVisLab after installation, an X server must also be provided. This can be done in several ways, including using xvfb.
A multistage build is used to make the final image slightly smaller.
# ----------------------
# common base container
# ----------------------
FROM ubuntu:24.04 AS base

ARG DEBIAN_FRONTEND=noninteractive

ENV XDG_RUNTIME_DIR='/tmp/runtime-root'

RUN apt-get update \
 && apt-get upgrade -y \
 && apt-get install -y --no-install-recommends \
    apt-utils \
    fontconfig \
    libfontconfig1-dev \
    libgl1-mesa-dev \
    libglu1 \
    libglu1-mesa-dev \
    libgomp1 \
    libgstreamer-plugins-base1.0 \
    libgstreamer1.0-0 \
    libnss3 \
    libopengl0 \
    libxcb-cursor0 \
    libxcb-icccm4 \
    libxcb-image0 \
    libxcb-keysyms1 \
    libxcb-randr0 \
    libxcb-render-util0 \
    libxcb-xinerama0 \
    libxcb-xinput0 \
    libxcb-xkb1 \
    libxkbcommon-x11-0 \
    locales \
    mesa-common-dev \
    ttf-bitstream-vera \
    wget \
    xorg \
    xvfb \
    file \
 && sed -i -e 's/# en_US/en_US/' /etc/locale.gen \
 && locale-gen \
 && apt-get autoremove \
 && apt-get clean

ENV LANG='en_US.utf8'
ENV LC_ALL='en_US.utf8'
ENV LANGUAGE='en_US.UTF-8:en'

# ---------------------------------------------
# intermediate container for the installation
# ---------------------------------------------
FROM base AS installer

RUN wget -O /MeVisLabInstaller.bin\
  https://mevislabdownloads.mevis.de/Download/MeVisLab4.1.2/\
Linux/GCC11-64/MeVisLabStandardSDK4.1.2_gcc11-64.bin
RUN chmod +x /MeVisLabInstaller.bin
RUN xvfb-run /MeVisLabInstaller.bin \
  --mode silent --prefix /opt/mevislab --no-desktop-files

# ---------------------------------------------
# final image
# ---------------------------------------------

FROM base AS sdk

ENV MLAB_ROOT=/opt/mevislab/Packages
COPY --from=installer /opt/mevislab /opt/mevislab