List of Figures
CMake is an open-source, cross-platform family of tools designed to build, test and package software. CMake files are widely supported by many development environments.
MeVisLab makes use of CMake files for building source code since version 3.5. Previous versions used the qmake build file translator by Qt, that translated .pro and .pri files into the platform specific build projects. A converter tool that translates .pro files into CMake files reasonably well is available in MeVisLab.
For the general documentation for CMake visit the CMake reference at cmake.org.
CMake is not delivered with the MeVisLab SDK. It needs to be installed by the user if she or he wants to build their own modules. Several IDEs automatically install a version of CMake.
A description of the syntax in CMake can be found in the CMake Tutorial. A glance at the available commands in the command reference and at generator expressions might also be helpful.
MeVisLab comes with some useful CMake functions that handle some repeated or error-prone tasks. They are listed later in this document.
In a later chapter there are also some hints what to do when old .pro files shall be manually migrated to CMake files or how to fix some of the things the automatic converter does not get right.
CMake based projects generally contain a file CMakeLists.txt at root level
that describes the steps to build, test, and install a project.
In MeVisLab, there are some special CMake functions that handle scenarios that are specific to MeVisLab and its package structure.
Side note: CMakeLists.txt can also include the
CMakeLists.txt of sub-directories with the
command add_subdirectory().
A typical example (MLModuleWrapperExample/CMakeLists.txt):
cmake_minimum_required(VERSION 3.20)
project(MLModuleWrapperExample)

find_package(MeVisLab COMPONENTS ML MLABBase Network HINTS "$ENV{MLAB_ROOT}" REQUIRED)

set(CMAKE_AUTOMOC TRUE)
find_package(Qt6 COMPONENTS Core Gui REQUIRED)

add_library(MLModuleWrapperExample "")
add_library(MeVisLab::MLModuleWrapperExample ALIAS MLModuleWrapperExample)

generate_export_header(MLModuleWrapperExample)

target_sources(MLModuleWrapperExample PRIVATE
    mlModuleWrapperExample.cpp
    mlModuleWrapperExample.h
    MLModuleWrapperExampleInit.cpp
    MLModuleWrapperExampleInit.h
)

target_compile_definitions(MLModuleWrapperExample PRIVATE
    MEVIS_TARGET=MLModuleWrapperExample)

target_link_libraries(MLModuleWrapperExample
  PUBLIC
    Qt6::Core
    Qt6::Gui
    MeVisLab::ML
    MeVisLab::Network
    MeVisLab::MLABBase
)

mlab_install(MLModuleWrapperExample NS MeVisLab)
Here is a short explanation of the individual statements:
cmake_minimum_required(VERSION 3.20)
This tells CMake which CMake version is required at minimum. This is important, because it also activates/deactivates some features in the CMake language, depending on the given version. MeVisLab currently requires 3.20.
project(MLModuleWrapperExample)
This sets the name of this project. However, this is the simplest form. It is recommended
to specify at least the VERSION.
find_package(MeVisLab COMPONENTS ML MLABBase Network HINTS "$ENV{MLAB_ROOT}" REQUIRED)
This command tells CMake that the project links against parts of MeVisLab. The actual
'parts' are listed after the COMPONENTS option.
The HINTS option tells CMake where to find the central MeVisLab
cmake file, which resolves the linked libraries and adds the required additional CMake
functions. In this case it tells CMake to search relative to the MLAB_ROOT
environment variable, which should point to the packages directory
of your MeVisLab SDK installation directory.
(This should automatically be set by the SDK installer.)
![[Note]](images/note.png) | Note |
|---|---|
|
set(CMAKE_AUTOMOC TRUE)
This is a project that builds against the Qt toolkit. Setting the variable
CMAKE_AUTOMOC to TRUE tells CMake
that the Qt moc tool should automatically be applied to all relevant source
files.
find_package(Qt6 COMPONENTS Core Gui REQUIRED)
This tells CMake to look for Qt6 in the third-party libraries, and the necessary components.
Note that this should always come after find_package(MeVisLab), as this sets
some CMake search paths; otherwise another Qt installed on your system might be found.
There should be a find_package() statement for every required
third-party dependency.
add_library(MLModuleWrapperExample "")
add_library(MeVisLab::MLModuleWrapperExample ALIAS MLModuleWrapperExample)
This tells CMake to add a library target called MLModuleWrapperExample.
It is good practice to add the target under a vendor-specific namespace, which is done
with the second add_library.
A different namespace than MeVisLab shall be used for own projects to avoid name conflicts.
Always link to projects with their namespace name.
generate_export_header(MLModuleWrapperExample)
It generates and uses a header file that contains platform and compiler specific EXPORT macros.
target_sources(MLModuleWrapperExample PRIVATE
    mlModuleWrapperExample.cpp
    mlModuleWrapperExample.h
    MLModuleWrapperExampleInit.cpp
    MLModuleWrapperExampleInit.h
)
This lists the source files that should be compiled. Note that these files should
usually be defined as PRIVATE.
target_compile_definitions(MLModuleWrapperExample PRIVATE
    MEVIS_TARGET=MLModuleWrapperExample)
Set the MEVIS_TARGET compile definition to be used for the compile process.
target_link_libraries(MLModuleWrapperExample
  PUBLIC
    Qt6::Core
    Qt6::Gui
    MeVisLab::ML
    MeVisLab::Network
    MeVisLab::MLABBase
)
These are the targets this project links against. Some belong to Qt, some belong to MeVisLab itself. Note that since the dependencies are public, they are also made part of the link interface and would be automatically available to projects linking this target.
mlab_install(MLModuleWrapperExample NS MeVisLab)
Generates MeVisLab specific install rules for this project.
One should use
mlab_install(MyProject NS MyNamespace)
add_library statement).
And if other projects should be able to link against this project, use these statements instead:
mlab_install(MyProject NS MyNamespace EXPORT)
mlab_install_headers(MyProject)
find_package(MeVisLab COMPONENTS ... HINTS "$ENV{MLAB_ROOT}" REQUIRED)This should be one of the first statements in every CMakeLists.txt project
(after cmake_minimum_required() and project()).
This will provide some MeVisLab specific functions and change various CMake settings.
It will also set up the target directories for the custom package (by calling
mlab_setup_current_package).
Set the CMake variable MLAB_AUTOMATIC_PACKAGE_SETUP to OFF first
if this needs to be used outside of a MeVisLab package
Example:
find_package(MeVisLab COMPONENTS ML HINTS "$ENV{MLAB_ROOT}" REQUIRED)mlab_add_executable(<target>)
It is a special command to create an executable target and put it into the bin directory of the MeVisLab package.
Example:
mlab_add_executable(MyTarget)mlab_add_test(<target> [RUN_SERIAL] [GUI] [EXECUTE_TEST <ON/OFF>])
Defines that the target is an executable that will be compiled to
CodeTests/bin (where it is found by the TestCenter too) and executed
as a unit test. Sources should be added with the target_sources() command.
Execution of the test can be suspended with the option EXECUTE_TEST
OFF.
The option RUN_SERIAL enforces that this test is not run in parallel with
other tests.
The option GUI makes this test an executable with a graphical user interface
(this usually does not make sense for a unit test).
Example:
mlab_add_test(MyTarget)mlab_install ([<target> NS <namespace>] [EXPORT] [OPTIONAL] [CONFIGURATIONS <config1>...])
This command installs the target in the correct package specific directory. It also generates
.mldepends files — if appropriate — that aid the installer generation.
It also makes sure that the necessary CMake files are generated in the package's
cmake directory.
With EXPORT one specifies that other libraries can link against
this library. One would usually also call
mlab_install_headers
in this case.
If OPTIONAL is specified, cmake will ignore if files to install
are missing, e.g., because the project failed to build.
If the environment or CMake variable MLAB_AUTOMATIC_POSTBUILD_COPY is true,
then this function will also make sure that the resulting libraries and CMake files are directly
copyied to the lib and cmake directories of the
source package after building. This way the install step can be avoided, which
improves on the build-and-debug cycle. However, the CMake installation phase is not
executed and therefore no corresponding settings are applied.
If you also want to install .pdb files for debugging (.debug files on Unix), you can set the global CMake variable MLAB_INSTALL_PDBS, this variable is checked by mlab_install.
Example:
mlab_install(MyLibrary NS MyNamespace EXPORT)mlab_install_directory(<sub_directory> [<install_arg1>...])
If a directory isn't covered by
mlab_install_package
(or there is the need to do it all manually), then it can be installed separately with this command.
The corresponding target directory is determined automatically.
If one wants to set separate arguments for the generated install statement
(like EXCLUDE) one can give it as additional arguments.
USE_SOURCE_PERMISSIONS is set in any case, though.
Example:
mlab_install_directory(Sources)mlab_install_file(<filename> [<install_arg1>...])
Same as mlab_install_directory for a single file.
Example:
mlab_install_file(Description.txt)mlab_install_headers(<target>)
Installs the necessary header files for an exported target
(with mlab_install(... EXPORT)).
This function will detect dedicated include directories like
include/Include and set the
exported include directory for the installed library accordingly.
Note that this function uses a very simple heuristic by just copying
certain file extensions (*.h and *.hpp)
from certain directories (".", include,
Include and src). CMake properties on targets,
files or directories are not taken into account. Also almost no corresponding files
from the
BINARY_DIR
directory are copied either, except for a header generated by
generate_export_header
that uses the standard naming conventions.
Example:
mlab_install_headers(MyLibrary)mlab_install_package([GLOB_PROJECTS] [WITH_TESTCASES])
This command goes into the CMakeLists.txt alongside your
Package.def file. It generates
install
statements for all the source directories that are typically needed for a package
(like Modules, Documentation/Publish, etc.),
so that one can install the source package into a separate directory,
without polluting the source directory with the compiled libraries as it is common practice
when using CMake.
The GLOB_PROJECTS option tells this command to automatically install all
Modules sub-directories that it finds in the Projects directory
of the current package.
With WITH_TESTCASES, also the TestCases directory is installed.
Together with GLOB_PROJECTS, this also finds TestCases
sub-directories in the Projects directory.
Example:
mlab_install_package(GLOB_PROJECTS)mlab_setup_current_package([<source_dir>])
Sets the output directories for the current (or given) directory. It is recommended to
use this command in the CMakeLists.txt file alongside the
Package.def file. It also sets the variables MEVISLAB_PACKAGE_ROOT
(pointing to the directory of the Package.def),
MEVISLAB_PACKAGE_GROUP (the package group name as found in the
Package.def), and MEVISLAB_PACKAGE_NAME
(the package name as found in the Package.def).
If the files
<package_group>_Settings.cmake and/or
<package_group>_<package_name>_Settings.cmake are found
anywhere in the CMake module search path, then they will be also included at this point.
(Note: The cmake directory of any package is automatically added to the CMake module search path.)
This allows to set package specific compiler settings in a central place.
If mlab_setup_current_package() has already been called successfully
in a directory above the current CMakeLists.txt, this function will do nothing
(it looks for MEVISLAB_PACKAGE_ROOT).
There are a few pitfalls that one should be aware of when migrating from .pro files
to CMake files, even when using the .pro file converter in MeVisLab.
MeVisLab has an interactive tool for converting .pro files into CMake files.
This is accessible through the MeVisLab main menu, select
Scripting → Migration → Convert Pro Files to CMake...
This is how it looks like (with a package from the Standard SDK converted):
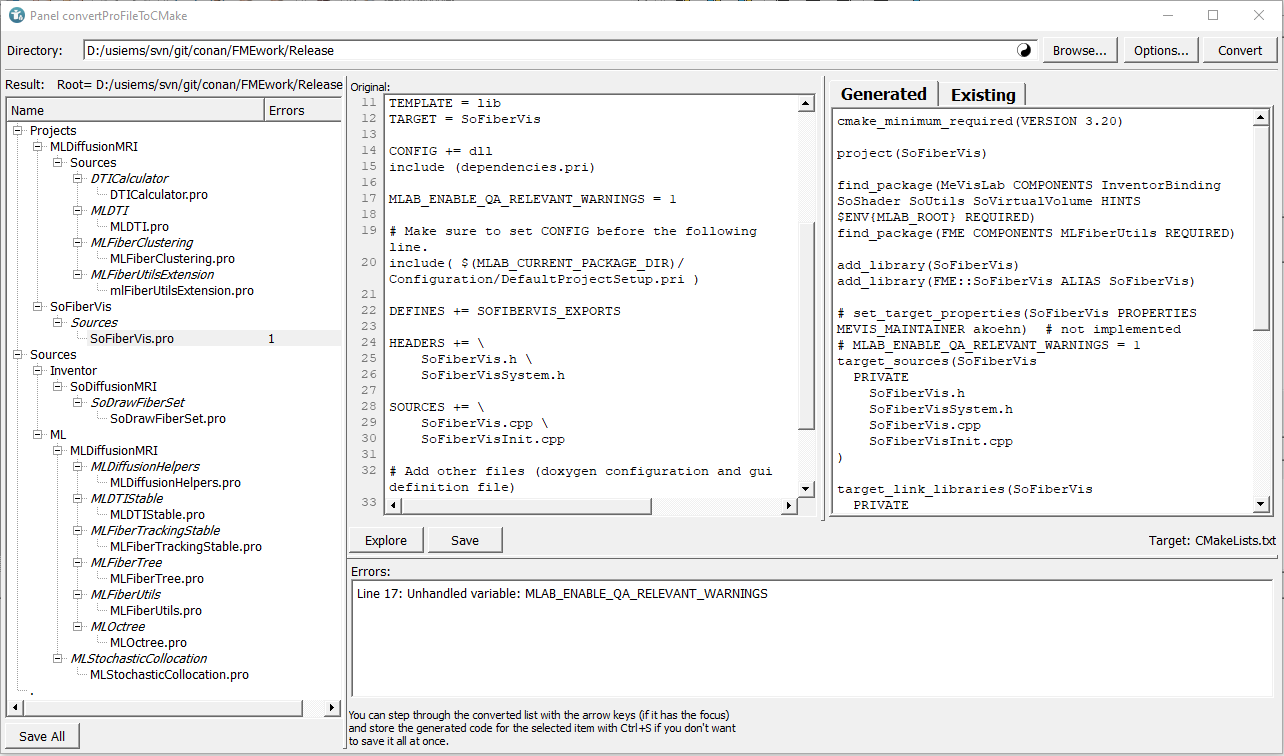
Select in the upper bar the directory of the .pro files that should
(recursively) be converted with the Browse... button. The directory is
persistent, so there is no need to re-enter the directory for another try.
The Options... button opens a small dialog where one can define which packages should get which CMake namespace. A sample definition could look like this:
MyPackageGroup/*=MyNamespace
MyPackageGroup/MySpecialPackage=MySpecialNamespace
This is also persistent, so this needs to be entered only once.
After entering this data, pressing the Convert button starts the process.
The script will now first scan all packages for package .pri files
(which it will need to
correctly assign CMake namespaces to the entries in the CONFIG variable).
Then it will convert the requested .pro files. The resulting files are not
written back immediately, but listed in the area below, where they can be inspected and saved
manually.
The list on the left side displays all the converted files and directories. Note that one can
also click on intermediate directories, since CMakeLists.txt files are
generated for these too (for the necessary
add_subdirectory
statements).
If there were any errors during the conversion,
a number on the right of the item will show how many errors were emitted for this file.
The area to the right of the list allows the inspection of the conversion itself.
The left half shows the original .pro file (if one selects a .pro file,
for directories this stays empty).
The right half shows the resulting file under the Generated tab.
If there is already a file in this place, its content is shown under the
Existing tab. The target file name is shown below this area on the right
(usually it is "CMakeLists.txt", but if more than one .pro
file is in a directory, the converter will decide to work with include files that end on
.cmake).
Below this are two buttons Explore and Save. Explore will open the file explorer at the selected location. Save will save the currently selected file. The keyboard shortcut Ctrl+S will also do this.
| Note |
|---|---|
All files are saved together with the Save All button below the directory/file tree (keyboard shortcut Ctrl+Shift+S). |
The area below the text areas shows the warnings/errors that happened for the selected file. One should inspect any errors and modify the generated file if necessary.
The entries in the CONFIG variable usually denote other libraries that the project
links against.
The name stays the same for entries that are found in one's own package .pri files,
but is prefixed with the CMake namespace that was defined in the dialog opened by the
Options... button. The known exports of the StandardSDK on the other hand are
converted through an internal list. These are then added as arguments of the
target_link_libraries
function.
Occasionally an entry in the CONFIG variable is unknown. The converter
will still treat this as a library to link, but will prefix it with the UNKNOWN
namespace. To resolve this, one needs to find either what the correct CMake name for this
library is, or if this is not a library at all and just serves some other purpose. In this case one
might perhaps use an
option
statement to define an optional variable, and some
if
statement afterwards that uses this variable, and has the necessary
statements in its body. What these statements should look like is out of scope for the converter
and this text.
Include directories in CMake are specified through the
target_include_directories
directive. One important aspect of this is that the directories are specified differently
for in-build use and after installation (this assumes that the target library is installed
in a completely different directory).
For in-build use, include directories are specified as absolute paths, using the
CMAKE_CURRENT_SOURCE_DIR variable, and in a generator expression that only expands
for the in-build use. Example:
target_include_directories(MLModuleWrapperExample PUBLIC
  $<BUILD_INTERFACE:${CMAKE_CURRENT_SOURCE_DIR}>
  $<BUILD_INTERFACE:${CMAKE_CURRENT_SOURCE_DIR}/someSubDirectory>
)
These directories should be PUBLIC if other libraries build against
this library.
For building against the installed library, include directories are specified as relative
paths, but relative to the installation folder.
If one uses the
mlab_install_headers
directive, it is not necessary to do anything
if your include directory is the source directory of your library itself, or a sub-folder called
include, Include, or src,
since mlab_install_headers sets this
automatically. Otherwise it is necessary to add a statement like this:
# compute relative installation directory:
file(RELATIVE_PATH REL ${CMAKE_SOURCE_DIR} ${CMAKE_CURRENT_SOURCE_DIR})

target_include_directories(MLModuleWrapperExample PUBLIC
  $<INSTALL_INTERFACE:${REL}/someSubDirectory>
)