DicomTool
Purpose
The module DicomTool combines several often needed DICOM tools. It allows you to:
Save a dataset as single DICOM slices.
Send a dataset to a PACS system using C-STORE.
Change, delete and add DICOM Tags before saving/storing.
Verify basic DICOM connectivity using C-ECHO.
Usage
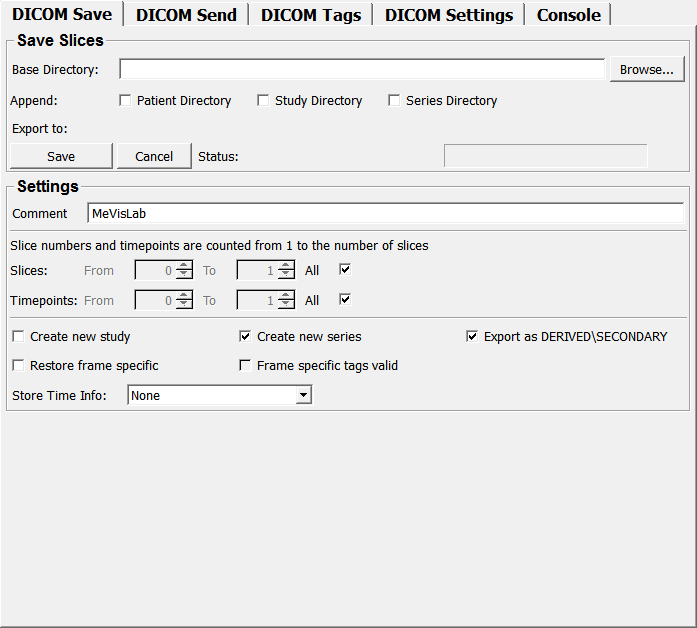
DICOM Save
This tool allows you to save a selected subset of slices from the input image to a directory on disk. The name of the export directory can be automatically generated using PatientName, Study UID, and Series UID to create useful directory structures for multiple patients/studies/series.
Connect an image to the input of the module.
Enter the name of a directory in the Base Directory field, or use the Browse… button to select a directory.
Optionally, check any or all of the Append: options. This allows you to create deep directory hierarchies in the form
c:\ExportDir\PatientName\StudyUID\SeriesUIDand simplifies the saving of images from different patients as it automatically creates new directories as needed.If necessary, adjust the options in the Settings box:
Specify a Comment included in all DICOM slices.
Select which slices and time points you want to export. The default is to export the entire dataset, but you can choose to only export one time point or all time points for one slice, etc. If the All checkboxes are checked, the From and To values are not used; instead, the entire range is selected internally.
Specify whether to create new DICOM Series and Study UIDs for the generated DICOM slices.
Check the Restore frame specific option if you want to export the individual DICOM slices with the original frame specific tags obtained when importing the original DICOM data. This is only possible if the 3D/4D structure of the image to be exported matches the structure of the original datasets, i.e., the number of spatial and temporal positions has not been changed. The checkbox Frame specific tags valid indicates whether this is the case. If Restore frame specific is selected and there is a mismatch between the image properties and the structure of the stored frame specific tags, a warning is displayed and the Save and Store buttons on the DICOM Save and DICOM Store panels, respectively, are disabled.
If Export as DERIVEDSECONDARY is enabled (default), the DICOM tags of the exported images are changed to conform to a secondary DICOM capture object. In particular, the ‘ImageType’ tag value will be set to DERIVEDSECONDARY.
Use the Store Time Info field to specify whether the time dimension info (as displayed by the
Infomodule) should be stored in the DICOM acquisition and/or content time tags of the exported slices.
Press the Save DICOM Slices button so save the images.
Tips:
Check the box next to Create New Series to store the DICOM images in a new series. This prevents the mixing of original images and images that were changed in MeVisLab if you store the images into a remote PACS system.
Check the box next to Create New Study to store the DICOM images in a new study. This prevents the mixing of original images and images that were changed in MeVisLab if you store the images into a remote PACS system.
DICOM Send
The DICOM Send tool is an interface to the storescu and dcmsend applications by OFFIS. It allows for sending DICOM images to a DICOM Storage Service Class Provider (aka PACS).
To use this tool, you must first define the DICOM Settings of the DICOM Application Entity you want to send the image to. Once you have entered the settings, they will appear in the top part of the panel.
Connect an image to the input of the module.
Optionally, select the application that should send the DICOM images.
dcmsendis a newer and much faster implementation that sends all images at once.Optionally, select the slices and time points you want to send and other options in the DICOM Save panel.
Press the Store button.
If you have enabled the Verbose or Debug flags, the output of the
storescuordcmsendcommand will be shown in the DICOM console.
The images will first be saved to a temporary directory on disk and then be sent to the DICOM Server.
Tips:
The storescu application itself is explained here, while dcmsend is described here. Note that none of the other options available are used here, only -aec (Calling AET), -aet (Called AET), peer (Hostname) and port and -d (Debug) and -v (Verbose).
DICOM Settings
This tool allows you to define the parameters of a DICOM Entity and save them to a configuration file on disk.
Enter the parameters that are needed for DICOM communication. The parameters are:
Name: A name to identify the setup. You can enter any string that helps you to remember to which DICOM Entity this setup refers to.
Type: Define if this setup is a (remote) PACS or a Local Server. Currently, this value is just for your information, it is not used programmatically.
Calling AET: The Application Entity Title that is used by the caller (e.g., the
storescuapplication. Some PACS systems only allow certain AETs to connect; therefore, you can enter something here that your PACS allows. (This is not needed for Local Server.)Called AET: The Application Entity Title that is used by your remote PACS system. If you use the wrong AET here, communication will most likely fail. For a Local Server entry, this is the AE Title used by the local
storescpprocess to receive images.Hostname: The Hostname or IP Address of the PACS system. (This is not needed for Local Server.)
Port: The port on which the PACS Server listens.
Press the Save button to save these settings into a file in your MeVisLab settings directory ($HOMEMeVisLabSettings). The file is called DICOMSettings.xml.
Press the Load button to load previously saved settings from your settings directory.
You can save multiple Configuration sets into the DICOMSettings.xml file. To do this, just define a new configuration by entering a new Name and press the Save button.
You can select a configuration set to be currently active by selecting it from the drop-down menu.
The Delete button allows you to remove a configuration set from your list. Make sure to press Save to store these changes.
If the Auto load checkbox is checked, the module automatically tries to load the configuration file DICOMSettings.xml during startup. Uncheck this box if you want the configuration values fixed in your network.
Check the low-level DICOM connectivity with the DICOM Echo tool.
DICOM Echo
The DICOM Echo tool is an interface to the echoscu application by OFFIS. It allows for checking the basic DICOM connectivity to a remote DICOM entity. The echoscu application sends a DICOM C-ECHO message to a Service Class Provider (SCP) and waits for a response (this is similar to checking the TCP/IP connectivity with the ping command).
To use this tool, you must first define the DICOM Settings of the DICOM Application Entity you want to check. Once you have entered the settings, they will appear in the top part of the panel.
Press the Ping button. A new window will pop up and show you the result of the
echoscucall.You can use the Verbose and Debug checkmarks to get more information from the
echoscuapplication output to the DICOM console.
Tips
The echoscu application itself is explained here. Note that none of the other options available are used here, only -aec (Calling AET), -aet (Called AET), peer (Hostname) and port.
Here is some example output that can help you to diagnose problems. Without any of the Verbose and Debug options, you can expect the following results:
Good:
Starting Task:

Task finished.
Bad:
Starting Task:
echoscu: Association Request Failed:
0006:031b Failed to establish association
0006:0317 Peer aborted Association (or never connected)
0006:0320 Attempt to connect to unknown host: lokix.cevis.uni-bremen.de

Task finished.
The host was not found at all. Check the entered host name or IP address.
Bad:
Starting Task:
echoscu: Association Request Failed:
0006:031b Failed to establish association
0006:0317 Peer aborted Association (or never connected)
0006:031c TCP Initialization Error: No error

Task finished.
The DICOM communication failed, a possible problem is that you entered the wrong DICOM port.
Console
The Console displays the output generated by the echoscu or storescu applications. Depending on the Verbose and Debug options, you get more or less output.
Use the Clear button to clear the console
The Auto clear flag clears the DICOM console before each run of a new command (
echoscuorstorescu) to prevent overfilling of the console, which slows down MeVisLab. It is recommended that you set this flag.
Windows
Default Panel
Input Fields
inImage
- name: inImage, type: Image, deprecated name: input0
Parameter Fields
Field Index
|
|
|
|
|
|
|
|
|
|
|
|
|
|
|
|