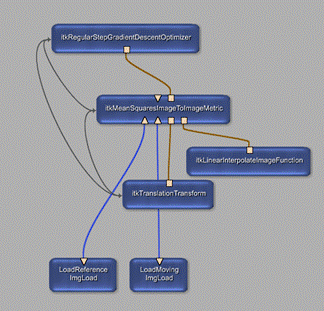
General structure of a MeVisLab network for registration with itk

As shown in the figure above you will need for a registration with ITK a transformation, an interpolator, a metric-module and an optimizer, and, of course, you need two images. The inputs and outputs of these modules have to be connected as follows:
- The first input of the metric must be the reference image, the second the moving image. Besides the transform-module has to be connected to the first Base input and the interpolator to the last input.
- The Base output of the metric has to be connected to the optimizer.
Furthermore there should be some field-connections between the metric, the optimizer and the transform modules:
- Every optimizer possesses a field named <<Finish Notifier . This field should be the destination of a connection to the Set Output button of the metric. And besides the Set Output should be connected to the Get Parameters field of the transform module. In doing so the metric automatically updates its output image, which is the result of the registration, after the registration is finished.
- It may be also a good idea to connect the Parameters Field of the transform-module with the Initial Position of the optimizer. So you do not have to edit this field manually.
If you have established all these connections you can touch the Set Output button in the metric panel, to set the metric for the optimizer. You also get a first output image: The moving image transformed by the parameters given in the transform panel. Now you can start the registration process by pressing the Start Optimization button in the optimizer panel. Please note: Some optimizers need some more parameters, e.g. for scaling, that must be edited before you can start the optimization.
See Integration of ITK Algorithms in MeVisLab for further information about the ITK-MeVisLab bindings.